Showing posts with label cherry cobbler. Show all posts

Tuesday, September 20, 2011

NOEL Christmas Banner Using Emboidery Rings

You know when you get an idea in your head and then when it starts to come out your beyond excited. Well today's post is exactly that, I was sitting in my studio thinking what can I do and as I was cleaning up I found 5 (yes 5) oval embroidery rings made out of wood. And thought what can I create with these. I had treated myself to a new Christmas Kit and had everything for it sitting in front of me and then it came to me what about a banner that says "NOEL". And this is what I created and I am so super excited about it too.

This can be altered using any type of paper, I will be doing one for my workshop out of Stampin' Up products and definitely using MDS (My Digital Studio). I probably won't get that one done until I return from my holidays but maybe I will. When you are inspired sometime you just have to get it out, right?

What I used:
  • 5 embroidery rings (oval)
  • Any Christmas scraping kit
  • 5" or larger wide satin ribbon in matching colour
  • Cherry Cobbler card stock
  • Early Espresso card stock
  • Buttons
  • jewels
  • glitter
  • Very Vanilla card stock
  • Stamp Set Creative Elements
  • Cherry Cobbler 5/8 Seam Binding
This is how looks like all put together
and on the wall, can you say WOW!
Close-up showing a little more detail.

The following images show each one separately so you can see the details of each one.

For those who know me I can never really create
something with even numbers so of course I had to have
another embroidery hoop and this works so well.
I love that my quirky habits work out.
"N" ice. How nice this patterned paper it is vintage and
sparkly and lends itself with the ribbon and buttons 

"O"h my I love the ascent paper that I used here again
the buttons work so well and so simple.

Close-up showing how I used Creative Elements
Stamp from Stampin' Up it doesn't always have
to be something Christmas related, I used it as a
background it it makes the letter pop!

"E"cellent  love the damasks look of the paper so pretty!

"L"ove I so love how this project turned out!

Tuesday, June 21, 2011

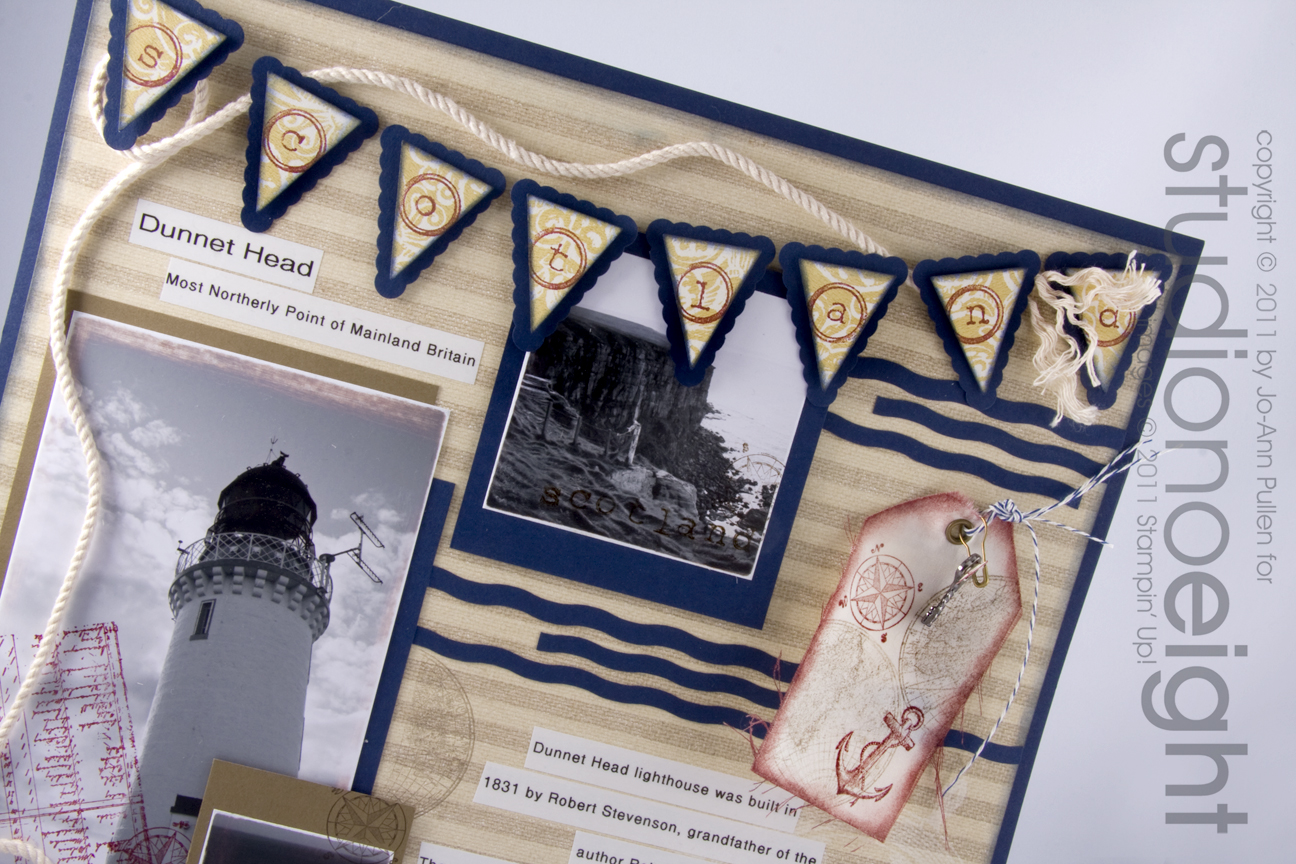
Dunnet Head Scotland - Using the Open Sea

I love Scotland and I miss it terribly, today's post is using Stampin' Up's The Open Sea stamp set which I absolutely love and Rough Type.

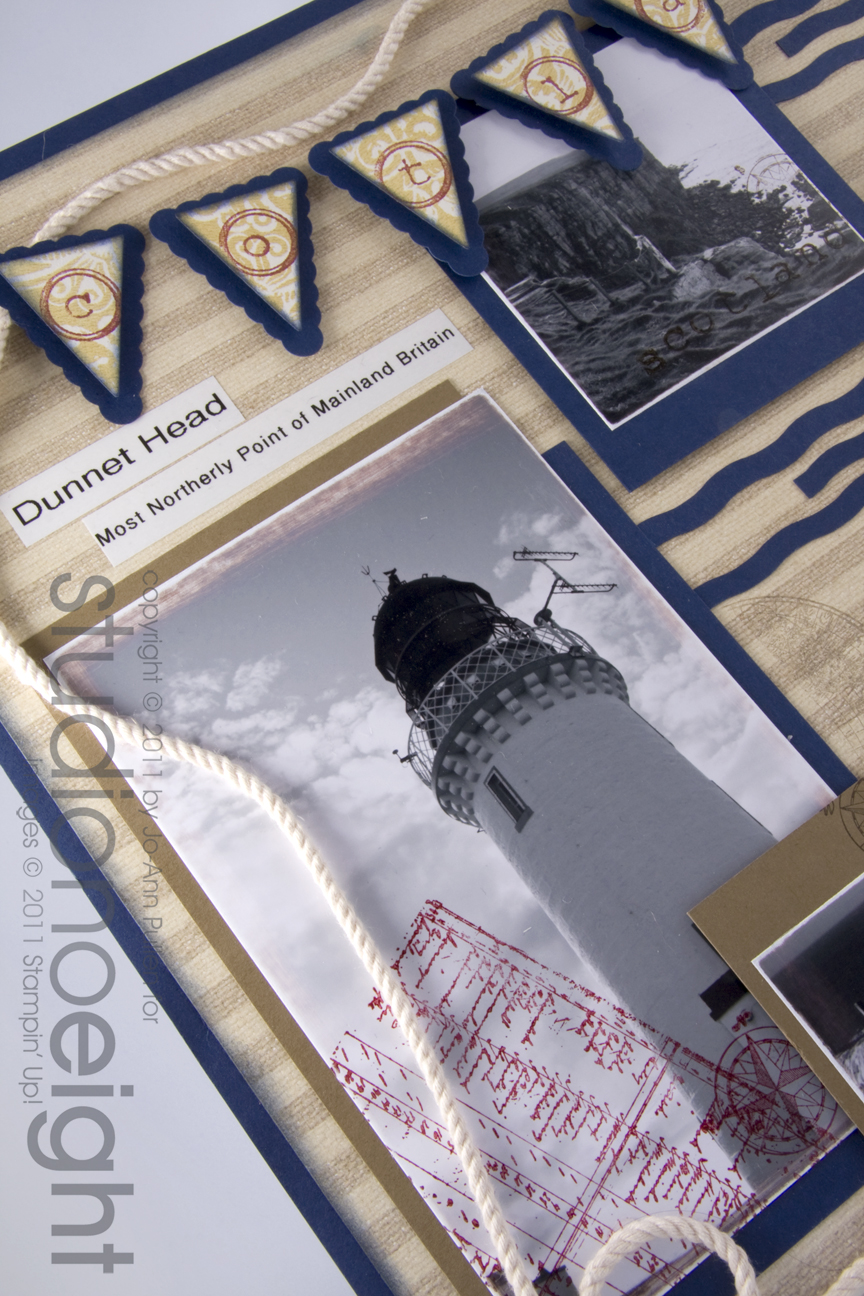
Dunnet Head is the most northerly point of mainland Britain. Dunnet head lighthouse was built in 1831 by Robert Stevenson, grandfather of the author Robert Louis Stevenson. The stone used to create this beautiful lighthouse and its surrounding walls was taken by horse and cart 3.2 km overland from Brough Harbour.

The cliffs as you can see are high and the view is never ending sea, the wind was cool and fresh such a beautiful place to visit.

Dunnet Head Scotland

Close up using Petite Pennants Punch
and Rough Type
I love to stamp on my photos, I find it gives them a
more aged look and I love that look.

Tag made of linen material which I stamped on using The Open Sea stamp set 
and Cherry Cobbler Classic Ink added a mini tag with the date and
year and key to round up the look

Friday, December 3, 2010

A Little Country Chair 1 x 1 Charm Swap

The Little Country Chair

There isn't anything you can't do in a 1 x 1 square, you just have to think outside of the box.


Last month I joined a 1 x 1 Charm Swap that Carol McFarland put together via Stampin Connect and I can't wait to get mine back. The only thing is I forgot to put return postage on my package and now have to send stamps so I can get my package returned LOL. This just shows you what kind of week I have had.

I named my swap "A Little Country Chair". I love stamps that are different anything with chairs, benches and stools I have. I am not sure exactly why but when I first saw "Have a Seat" in the 2010-11 IDEA BOOK & CATALOGUE I had to get it. I love the uniqueness of it, and the fact that you can add little things like a bird or a cup of tea on it or even a flower makes it so cute. To me a chair is always inviting, and there is so many things you can do with it. You can rest in it, read in it, hold a cup of tea on it. You can use it for storage, to hold a door open, you can stand on it to get something up high or put two together and make fort with it.

For this little piece of art I used the following:
  1. Have a Seat Stamp Set
  2. Charming Stamp Set
  3. Very Vanilla Card stock
  4. Vellum Card stock
  5. Cherry Cobbler Classic Ink
  6. Chocolate Chip Classic Ink
  7. Eyelets Antique Brass
  8. Basic Rhinestones
  9. Linen Thread
  10. Heart Small
  11. Vintage Wallpaper
  12. Smooch Pearlized Accent Ink Illuminate Top Coat
1 x 1 Charm with chain with the insert inside plus the packaging that I did for each one. Each charm is held onto the background using clear photo corners so that it can be removed easily without ripping.


View of the back of my charm showing the embossing and twine.


Tuesday, October 19, 2010

Contempo Christmas Scrapbook Page

Building a Scrap Booking Page One Size at a Time

So I am trying to be a good blogger and have been working on so many projects I had to schedule one day on the weekend just for a photo shoot. I always wanted to create a progressive scrapbook page but never had the time to do this until last weekend. I have done many 12 x 12 scrapbook pages and decided to change it up. I starting by building a 6 x 6 to a 11 x 8.5 to a 12 x 12 page. Using the Contempo Christmas stamp and the Contempo Wheel from Stampin' Up I began my little adventure.

6 x 6 Page with a small area for a 4 x 6 photo.

11 x 8.5 page with message, trees, and ribbon and of course some bling! Before adding the 6 x 6.

I love adding my own messages, poems or quote to my pages it makes it more personal, I generate these on the computer, print and cut.

11 x 8.5 with 6 x 6 attached looks pretty good just with this.

Close-up showing those beautiful trees and their bling.

12 x 12 page before adding the 11 x 8.5 and 6 x 6 page, almost done.

Close-up showing the cute little squares, which you could add photo's or not but the option is there.

The finished product looking pretty nice!


Close-up of the front showing more of the design.

Monday, October 18, 2010

Just Can't Get Enough Christmas Stamps!

Every year I tell myself the same thing, "no more Xmas stamps you have enough" and then I go to either a workshop or do a swap and see a card made and that's it I just have to have it.

If you are to buy only one stamp set (like that's possible for me) I would say this is the one. I love the clean lines the look and feel of this stamp. It is a stamp set that can be used over and over again and will never age. It is what it is contemporary. Absolutely one of my favorites from this years Stampin' Up catalogue. I have done to versions of this card, I have cased this one but can't remember where, but have changed the design to a different format, for both a horizontal and vertical style, you decided which is better.


Supplies Required:
Note: (w) = wood blocks (c) = clear stamps required clear blocks
Stamps:
Contempo Christmas Item # 118734 (w) # 120594 (c)
Contempo Item # 120324
Card stock:
Old Olive
Cherry Cobbler
Very Vanilla
Inks:
Old Olive Stamp Write Markers Item # 100079
Cherry Cobbler Stampin Write Markers Item # 105109
Misc:
Stampin Around Handle Item # 102971
Stampin' Around Uninked Cartridge Item # 101529
Old Olive Classic Stampin' Ink Refiller # 100531
Word Window Large Punch Item # 119857
Big Shot Item # 113439
Embossing Folders Perfect Polka Dots Item # 117335
Sponger Daubers Item # 102892

This will be one of the cards that guest will make at my Xmas Open House Sunday November 7.