Friday, September 30, 2011

3 Sleeps Till Tuscany

Happy Friday everyone! if your like me you are probably wondering where the week has gone? For me it has been organizing, crafting and well trying to pack for my vacation. Yesterday I headed with one of my girlfriends and her Mom to the states for some serious shopping and to pick up my shoes at the UPS store!

Of course the serious shopping turned into some serious material shopping, I don't know how Jo-Ann's does it I mean really, 4.99 for felt and then 40% off so I ordered 6 yards yes 6 of this absolutely beautiful dark grey felt and some red and green for a new project I am going to start after I get back. Your going to love it!


Today's post is what I made for our trip to Tuscany. For Yvonne and I, I did those design your own travel mugs, and for each person I designed 4"w x 5.75" h travel tags. the front has the design I created for the trip, with their name and date of the trip. On the back of each tag I did my version of "10 Things I LOVE About Tuscany" with lines and numbers so they can quickly add.

Well I should get back to my To Do List, tonight I am doing a demonstration for our Annual Holiday Hoopla Stampin' Up Party. I will post some pics tomorrow for you too see!

Thanks for dropping by!
Wednesday, September 28, 2011

Say Happy I Do Day With Elegant Eggplant

Well today is a busy day here at the studio, lots of doctor appointments, lunch and shopping trip for the last items on my list before my trip.

Today's post is a wedding from across the pond in lovely England. One thing about working for a high tech company is you have working peers in other countries that become long time friends. Though I no longer work for this company I am proud that the best thing I took away are those friendships and continue to enjoy the events in their lives.

The inspiration for this page was truly the beautiful images of Judith on her wedding day. The soft lilac of her dress, the colours of her roses in her bouquet and even right down to her sexy stylish shoes. Just BEAUTIFUL!

Congradulations JU JU you look marvelous!

Happy I so To You Judith.

I absolutly love these flowers they remind me
of Judith shoes and seriously the beading matchs
the layout like I picked it just for this
occasion, but I didn't.

Close-up of the Jewelery pin,
it doesn't always need to be something
from the scrapbooking section of a craft store.

Tuesday, September 27, 2011

Domestic Goddess Personalized Cookbook

Hi everyone and happy Tuesday, only 6 more days till I leave for Tuscany! I am starting to get excited but still so much to do till I leave. Projects to finish, blog to prepare, cleaning up my studio (like I ever get to that) and pack, yes I still have not packed.

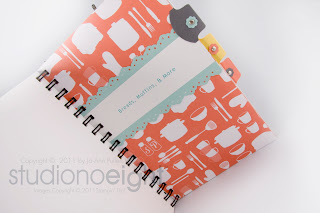
Today's project came to me as soon as the new catalogue came out. I don't know about you guys but I fell madly in love with the new designer series paper Domestic Goddess! I love anything to do with cooking and this paper was just the right recipe for my next project a personalized cookbook!

I have been working on this project for months now, constantly taking a look to see what I can improve or take away but I just love everything about it.

Vellum front cover.


For this project you will need the following:

  • My Digital Studio (MDS)
  • Domestic Goddess Designer Series Paper
  • Card stock: Vellum, Pool Party, Daffodil Delight, Basic Grey,
    Calypso Coral and Whisper White
  • Chipboard 12 x 12
  • Envelopes all Sizes Whisper White
  • Cellophane Bags
  • Ink: Vellum, Pool Party, Daffodil Delight, Basic Grey, Calypso Coral and Whisper White
  • Ribbon: 3/8 Ruffled Ribbon Pool Party, Baker's Twine White,
  • Now Your Cooking Stamp Set
  • From the Kitchen Of Stamp Set
  • Homegrown Stamp Set
  • Vintage Trinkets
  • Mini Library Clips
  • Brads Antique
  • Decorative Label Punch
  • Eyelet Border Punch
  • Scallop Oval Punch
  • Dotted Scallop Ribbon Border Punch
  • 1" Circle Punch
  • Round Label Punch
  • Scallop Edge Border Punch
  • Petite Pennants Builder Punch
  • Itty Bitty Shapers Punch Pack
  • Petite Pocket Bigz XL Dies
  • Top Note Die Bigz Dies
  • Binding machine, or your local Staples or other local printing company

Open the velum to reveal the
personalized front cover.

Inside cover personalized.

Adding envelopes allows for recipes
to be stored that have been passed
down through the years!

Appertizers and Beverages Section.

Another fun pocket page with slide in pocket,
tabs for each section.
  
Breads Muffins and More Section.
 
Breakfast and Brunch Dishes Section

Shopping List Notes
Back Cover again you can personalize and give as
gift and Date and sign when you gave it.

Book open flat with recipes cards that you
can tape into book or glue so simple.

I hope todays project inspires you to create your own cookbook for yourself or for a gift.

Monday, September 26, 2011

2011 Christmas Scrapbooking Tin Using Holly Berry Bouquet from Stampin' Up


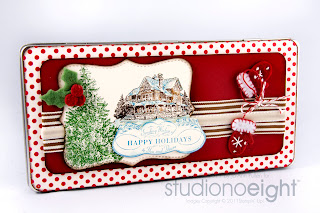
Today's project is a Christmas Scrapbook Tin that I created using products from Stampin' Up Holiday Mini Catalogue. I love giving little gifts and these types of tins are fantastic for that. With the holidays not far away I have started thinking of gifts to give that are both creative and fantastic keepsakes and great hostess gifts that will be soooo loved.


Christmas Scrapbook Tin Front

I will be doing a workshop for this particular class in November and a PDF on how to create for those who can't make the class.
For this project you will need:
  • metal tin (size 9.5" wide x 4.5" high)
  • Holly Berry Bouquet Designer Series Paper
  • 3/4 Velvet Stitched Ribbon
  • 1 1/4" Stripped Grosgrain Ribbon Soft Suede and Cherry Cobbler
  • Christmas Lodge Stamp Set
  • Winter Wishes Stitched Felt
  • Mini Jingle Bells
  • Stitched Stockings Stamp Set
  • Stocking Builder Punch
  • Card stock Early Espresso, Wild Wasabi, Very Vanilla and Cherry Cobbler
  • Dazzling Details
  • Jewels Basic Rhinestones
  • Bakers Twine Early Espresso / White
  • uni-ball Signo Gel Pen
  • Creative Elements Stamp Set
  • Dotted Scalloped Ribbon Border Punch
  • 3/16" Corner Punch
  • Lace Ribbon Border Punch
  • Top Note Bigz Dies
  • Crochet Trim Victoria 5/8"Antique Brads


Open tin with first page ribbon tab
opens to the inside pages.

Inside open page add a picture write a note or two.

Middle page for photo and you can slide a
note in behind the Lace Ribbon Boarder Punch.

Inside right page slip a photo behind the
ribbon add a note at the bottom.

Back of right hand page super cute with
mittens made of paper.
Thanks for stopping by tomorrows project is something that I have been working on for awhile so stay tuned!

Saturday, September 24, 2011

ColourQ Challenge #103

Today's post is a card that I did for the ColourQ Challenge. The ColourQ Challenge is a great way to challenge yourself and use colours that someone else chooses. In most cases these colours are found in everyday objects such as dishes, clothing, jewelry, etc. Why not try it yourself see here.


For this challenge I used:
  • Creative Elements Stamp Set
  • 3/8" Ruffled Ribbon Wisteria Wonder
  • Decorative Label Punch
  • Jewels Basic Pearls and Basic Rhinestones
  • Smooch Pearlized Accent Ink
  • Stampin Write Markers Wistera Wonder, Poppy Parade, Calypso Coral Pear Pizzazz
  • Blender Pens


Thanks for dropping by!

Tuesday, September 20, 2011

NOEL Christmas Banner Using Emboidery Rings

You know when you get an idea in your head and then when it starts to come out your beyond excited. Well today's post is exactly that, I was sitting in my studio thinking what can I do and as I was cleaning up I found 5 (yes 5) oval embroidery rings made out of wood. And thought what can I create with these. I had treated myself to a new Christmas Kit and had everything for it sitting in front of me and then it came to me what about a banner that says "NOEL". And this is what I created and I am so super excited about it too.

This can be altered using any type of paper, I will be doing one for my workshop out of Stampin' Up products and definitely using MDS (My Digital Studio). I probably won't get that one done until I return from my holidays but maybe I will. When you are inspired sometime you just have to get it out, right?

What I used:
  • 5 embroidery rings (oval)
  • Any Christmas scraping kit
  • 5" or larger wide satin ribbon in matching colour
  • Cherry Cobbler card stock
  • Early Espresso card stock
  • Buttons
  • jewels
  • glitter
  • Very Vanilla card stock
  • Stamp Set Creative Elements
  • Cherry Cobbler 5/8 Seam Binding
This is how looks like all put together
and on the wall, can you say WOW!
Close-up showing a little more detail.

The following images show each one separately so you can see the details of each one.

For those who know me I can never really create
something with even numbers so of course I had to have
another embroidery hoop and this works so well.
I love that my quirky habits work out.
"N" ice. How nice this patterned paper it is vintage and
sparkly and lends itself with the ribbon and buttons 

"O"h my I love the ascent paper that I used here again
the buttons work so well and so simple.

Close-up showing how I used Creative Elements
Stamp from Stampin' Up it doesn't always have
to be something Christmas related, I used it as a
background it it makes the letter pop!

"E"cellent  love the damasks look of the paper so pretty!

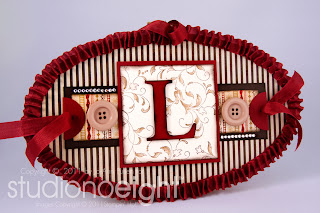
"L"ove I so love how this project turned out!

Monday, September 19, 2011

Somedays I Think My Studio is a Store

I swear, my studio could easily be a store I am always picking up things that I have good intentions of doing and then put it away and forget. Should I complain, probably not but really, I could be locked in here for a year and not need anything, OK well maybe tape, but that's all. LOL

Today's project is something that I have wanted to do for awhile but just never got around too. Maybe I felt it was overwhelming maybe I just couldn't think of what to do but once I got going it was so much fun. To solve the overwhelming idea I viewed each section as a card using the same materials but each one but laying them out different. Plus by making three pictures and the others like cards I think it worked.

Another thing I did was stamp on the photos and framed them with card stock and sanding down the sides. I also created the flower using sheer ribbon material and a special button given to me by my friend Stacey. She had several buttons gathered over the years, this particular one was my favorite and because she had a couple I didn't feel to bad taking!

The other thing I love were the pictures it's hard to believe that eight years has gone by since we got married, and the youngest is going to be 11 soon. And of course my Mom and Dad looking so proud. It was such a good day.

Thanks for dropping by!


Saturday, September 17, 2011

Birthday Card Photo Album Using Patterned Party


Happy Saturday!

So I am just heading out to get lots of things off my list before heading to Italy, for those who don't know I am taking part in a once and a life time trip see here. My BF and I will be traveling with designer, educator and author Ali Edwards on a tour of the scenic lands of Tuscany. Eight days plus an extending trip to Rome, food, wine, photography and design oh my! I know! I am so excited too that I will be blogging the whole trip while I am gone so make sure you subscribe and join me on my adventure of rediscovery.
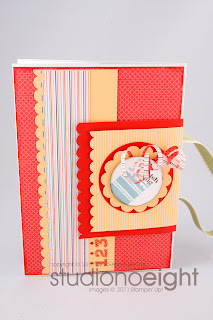

Birthday Card Photo Album
I love cards that actually do two things, one they help celebrate something and the other becomes a keep sake.

I remember as a kid my Mom would have boxes and boxes of cards that she had kept over the years, just store bought not handmade. She loves to always read them even today when we get a card she loves to read ours. I am not sure if it is the message that she reads or what is written that makes her do this but it is a tradition. This tradition came to her from my grandmother who kept letters and cards that my grandfather sent to her during the second world war which I have today and cherish.

I love a card that not only helps celebrate the occasion but it becomes something too. When Tammy Richard showed me this on one of her lovely visits I was total lov'n it. Hers was a little different, square, different paper etc but still the same concept. This was one of the 3D swaps that she was given at convention, just one of the fantastic things about convention, swapping!

So here is my version of  Birthday Card Photo Album.


I love the fact that this has a cute
little handle and sits so nicely on its side.


For this project I used the following:

  1. Patterned Party Stamp Set,
  2. Pear Pizzazz 1/2" Stitched-Poly Ribbon,
  3. Just Add Cake Designer Series Paper,
  4. Baja Breeze card stock,
  5. Poppy Parade,
  6. So Saffron,
  7. Whisper White,
  8. Petite Pennants Builder Punch
  9. Scallop Edge Border Punch
  10. Dotted Scallop Ribbon Border Punch
  11. Whisper White Bakers Twine
  12. Rounded Tab Punch
  13. 2 3/8" Scallop Circle Punch
  14. 2 1/2 Circle Punch
  15. 1 3/4" Circle Punch

Another view showing it standing tall.

Open view, the inside allows for a message,
notes and photos, two pockets allow
for more images and notes.

Close-up of the front, showing
a message so sweet!
  
Other side of card showing the banner and
pocket cards which slip into envelopes.

Friday, September 16, 2011

Beau Chateau Mini Canvas Album

I love everything about Stampin' Ups NEW line Beau Chateau, from the Designer Fabric to the Designer Paper, Side Notes even the Designrer Printed Album. For this project I wanted to do something smaller and different than an album. I bought a canvas mini album 4" w x 7" h with three rings and chipboard pages which are very easy to cover with paper.

The following project uses this line with a few extra items all from Stampin' Up!

The cover was done very simply by creating a stencil out of cardstock vellum using the die BigZ Tulipe (retired), and Marine Mist Crafting Ink with a sponge dabber. Then using the stamp set Established Elegance I stamped using Soft Suede Classic Ink directly on the canvas. Next I added ribbon 1 1/4" Marine Mist Striped Grosgrain Ribbon, 5/8" Marine Mist Satin Ribbon, and 5/8" Victoria Crochet Trim. Last using Beau Chateau Designer Fabric and BigZ L Fun Flowers I created and flower and held it together with an Antique Brad and a few Basic Pearl Jewels.


For the interior I used Beau Chateau Designer Series Paper and Side Notes and of course Marine Mist 5/8" Satin Ribbon.


Opening the ribbon tab reveals more surprises, and places for pictures and journaling.


I love creating smaller pages they feel like little pieces of art, and are so sweet when you use ribbon and even Simply Adorned Trinket Keys.


I love using envelopes in my designs they allow you to add items that you don't want to permanently add to any project. Simply slip these items into the envelope to store this will both protect the item and make it a conversation piece. And you can even stamp on the envelope to co-ordinate with what you are doing. So simple!
  

Another thing I simple love to use is MDS (My Digital Studio) most people use this for scrap booking or creating cards and other items but I like to use to create wedding invitations, party supply’s such as banners and cupcake toppers and my favourite is my version of the 10 Things Pocket for I Love About Being Your Friend. This was all created in MDS and printed on my home computer! Super easy and very custom which is something I love!

Another thing that I created in MDS is little journal pages using Bea Chateau Digital Papers. On one side I have a message and the left you could add a picture. Each of these 10 pages coincides with one of the numbers from my 10 Favourite Things. In the image below there is more room for pictures to be added.

Wednesday, September 14, 2011

Beau Chateau 4 x 4 Box with Mini Cards

Simple Small and Packed with a Sweet Surprise

I am lov'n everything Beau Chateau one of the many new lines from Stampin' Up! From the beautiful paper, Designer Printed 6 x6 Album, Designer Series Fabric and we can't forget also available as Digital Downloads. Why there are special stamp fonts called Letter It and numbers "Number It that you can both digital and wood and clear mount. Stampin' Up really out did themselves with this line and I am loven it.

For this post I have done a sweet little box with mini cards. Super easy and a great hostess gift you will want to make these over and over again.

4 x 4 Box using Marina Mist, Beau Chateau DS Paper,
1/8" Marina Mist Taffeta Ribbon, Wood Sheets

The set 4 x 4 Box with 6 cards

3 x 3 card using Pink Pirouette,
Beau Chateau DS Paper, Marine Mist
3/8 Taffeta Ribbon for the Hummingbird
I used our markers and added layers
of colours and rock and rolled